To frame a floor, anchor a sill plate to the foundation, set the beam, install rim joists, lay out and nail the floor joists, add blocking, frame the openings, and fasten the subfloor. The 2021 IRC covers anchorage in Section R403.1.6 and floor framing in Section R502.
Before you buy lumber, check your joist size against the span with the joist span calculator.
This guide gives the build sequence for a platform-framed wood floor and the 2021 International Residential Code (IRC) rule behind each step. For the drawing side, see how to draft a floor framing plan.
Key facts
- Wood sill plates are anchored with bolts at least 1/2 inch in diameter, spaced not more than 6 feet on center and extending at least 7 inches into concrete (2021 IRC Section R403.1.6).
- Joist, beam and girder ends need at least 1-1/2 inches of bearing on wood or metal and at least 3 inches on masonry or concrete (2021 IRC Section R502.6).
- Joists lapping over a bearing support from opposite sides must lap at least 3 inches and be nailed with three 10d face nails (2021 IRC Section R502.6.1).
- Joists must be laterally supported at the ends by full-depth solid blocking at least 2 inches nominal thick, or by a full-depth header, band or rim joist (2021 IRC Section R502.7).
- A floor-opening header spanning more than 4 feet needs doubled trimmer joists and a doubled header (2021 IRC Section R502.10).
- Floor framing is nailed in accordance with Table R602.3(1) (2021 IRC Section R502.9).
What do you need before you start framing a floor?
You need the joist size, species, grade and spacing from the plans, a foundation that is level, and the beam size. Joist sizes come from the span tables, not from this article: the floor joist span table guide reproduces 2021 IRC Table R502.3.1(2) with its load assumptions.
Spacing is 12, 16, 19.2 or 24 inches on center in those tables, and the choice changes the subfloor and the joist size. Engineered products such as I-joists, structural composite lumber and trusses follow the manufacturer's tables and details, and the code says their lateral support is set by the manufacturer (R502.7, exception 1). The adopted code edition and your local amendments govern all of it.
Subflooring must be at least utility grade lumber, No. 4 common grade boards or wood structural panels, and panel-edge blocking at least utility grade (R502.2.2).
How do you frame a floor step by step?
Work from the bottom up, nailing and squaring each layer before the next goes on.
Step 1: How do you install the sill plate on the foundation?
Set the sill plate flat on the foundation wall and anchor it with bolts that meet Section R403.1.6. The bolts must be at least 1/2 inch in diameter, spaced not more than 6 feet on center, and extend at least 7 inches into concrete or grouted masonry cells. They go in the middle third of the plate width, with a nut and washer tightened on each one.
Each plate section needs at least two bolts, with one bolt not more than 12 inches and not less than seven bolt diameters from each end. Approved anchors or straps may replace bolts at equivalent spacing. Seismic Design Categories C (townhouses), D0, D1 and D2 add plate washers and a tighter limit for tall buildings in R403.1.6.1, so check your category. Treatment, gaskets and bolt layout are in the sill plate guide.
Step 2: How do you set the beam or girder?
Set the beam or girder on its supports before any joist goes down, so the joists can lap or hang from it. Girder and header spans for dimension lumber come from Tables R602.7(1), R602.7(2) and R602.7(3) (R502.5), and built-up members are covered in the built-up beam guide. Where posts and a beam carry the floor, the IRC requires positive connections against uplift and lateral displacement (R502.9).
Bearing is the key check. A beam or girder end needs at least 1-1/2 inches on wood or metal and at least 3 inches on masonry or concrete, or approved hangers. Bearing on masonry or concrete is direct, or on a sill plate of at least 2-inch nominal thickness with a minimum nominal bearing area of 48 square inches (R502.6).
Step 3: How do you install the rim joist?
Lay the rim joists (also called band joists) on the sill around the perimeter, set flush with the outside of the foundation line you are framing to. They close the ends of the joists and give the lateral support that Section R502.7 requires. The rim joist guide covers the detail.
Fasten them per Table R602.3(1), using the option your plans call for.
2021 IRC Table R602.3(1), fastening schedule, floor items. One option shown per row; the table lists equivalent alternatives.
| Connection | Item | Fastener (one option) | Location |
|---|---|---|---|
| Joist to sill, top plate or girder | 22 | 3-8d common (2-1/2 in. x 0.131 in.) | Toe nail |
| Band or rim joist to joist | 27 | 3-16d common (3-1/2 in. x 0.162 in.) | End nail |
| Bridging or blocking to joist | 30 | 2-8d common (2-1/2 in. x 0.131 in.) | Each end, toe nail |
| 2-inch subfloor to joist or girder | 25 | 2-16d common (3-1/2 in. x 0.162 in.) | Blind and face nail |
| Wood structural panel subfloor, 19/32 in. to 3/4 in. | 32 | 8d common | 6 in. at panel edges, 12 in. at intermediate supports |
Item 23, which covers rim joist, band joist or blocking to the sill or top plate, has several nail options and spacings in the source table that do not extract cleanly, so read it in the code before nailing the rim to the sill.
Step 4: How do you lay out floor joist spacing?
Mark the same joist positions on the sill and the beam so each joist lands square across the span. Mark openings and bearing wall lines first, then the common joists at the planned spacing from one end.
Parallel bearing walls need extra framing under them. Joists under a parallel bearing partition must be of adequate size for the load, and double joists separated to pass piping or vents must be full-depth solid blocked with lumber at least 2 inches nominal thick, spaced not more than 4 feet on center (R502.4). A bearing partition perpendicular to the joists must not be offset from its supporting girder, wall or partition by more than the joist depth, unless the joists are sized for the extra load (R502.4).
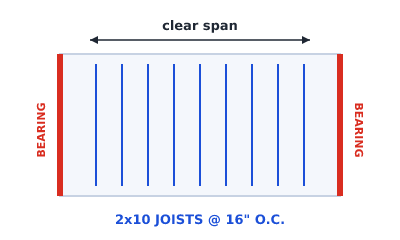 Joist direction and the two supports that define the clear span
Step 5: How do you install the floor joists?
Set each joist crown up, bear it on the sill and beam, and nail it to the rim and supports. Check that the span between supports matches the table you sized from. For notch and hole limits before anyone cuts for plumbing, check the cutting, boring and notching limits in Section R502.8.
Where joists come from opposite sides over a beam, lap them at least 3 inches and nail with a minimum of three 10d face nails (R502.6.1). A wood or metal splice with strength equal to or greater than the nailed lap is also permitted. Joists framing into the side of a wood girder need approved framing anchors, or ledger strips of at least nominal 2 inches by 2 inches (R502.6.2).
Step 6: How do you add blocking and bridging?
Add solid blocking at each support so the joists cannot roll. Section R502.7 requires full-depth solid blocking at least 2 inches nominal thick at the ends, or attachment to a full-depth header, band or rim joist. In Seismic Design Categories D0, D1 and D2, lateral restraint is also required at each intermediate support.
Joists deeper than a nominal 2 inches by 12 inches need more. Section R502.7.1 requires solid blocking, diagonal bridging, or a continuous 1-inch by 3-inch strip nailed across the bottom of the joists at intervals not exceeding 8 feet. Blocking is toe nailed to the joists with the item 30 option in the table above. The joist blocking and bridging guide has the detail.
Step 7: How do you frame an opening in a floor?
Frame openings with header and trimmer joists before the subfloor goes on. Section R502.10 sets three rules:
- Where the header joist span is 4 feet or less, the header is a single member the same size as the floor joist.
- A single trimmer joist can carry a single header that is within 3 feet of the trimmer's bearing.
- Where the header span exceeds 4 feet, the trimmers and the header are doubled and sized to support the joists framing into the header.
Stair openings follow the same rules plus headroom and stair geometry, which are in framing a stair opening.
Step 8: How do you install the subfloor?
Fasten the subfloor over the finished joist frame, with panel strength axis perpendicular to the joists. Wood structural panels are attached to wood framing per Table R602.3(1) (R503.2.3), and the span rating, thickness and edge support come from Table R503.2.1.1(1). The subfloor thickness guide lists them. Lumber subflooring must have its end joints over supports unless end-matched lumber is used (R503.1.1).
How do you frame a shed floor?
A shed floor uses the same parts: rim joists, common joists, blocking and subfloor. The difference is the base. Many sheds sit on skids or piers rather than a continuous foundation, so there is often no sill to bolt down, and small accessory buildings are often handled under local rules. Framing close to the ground may need decay protection under Section R317, covered in the sill plate guide.
What does this article not cover?
It gives the sequence, not the sizing. Joist spans are in the floor joist span table, and the full chapter is in the 2021 IRC online. Engineered floor systems use the manufacturer's tables, and the adopted code edition and local amendments govern every value here.
Summary
Frame a floor from the bottom up: anchor the sill plate (R403.1.6), set the beam with the required bearing (R502.6), install the rim, lay out and set the joists with a 3-inch lap over beams, add full-depth blocking at supports (R502.7), frame openings with headers and trimmers (R502.10), and fasten the subfloor per Table R602.3(1).
Framing Plan is a preliminary drawing aid. It draws joist layouts, beams and openings and exports PNG, PDF and DXF, but it does not check code or size members, and its editor works in millimetres. Open the framing studio to sketch the joist field, beams and openings before you build.